LEARN
Design Clinic: How To Light A Bridge
River crossings can be beautiful at night and some of the world’s most famous architectural landmarks are bridges. As such, they need special attention when designing the lighting.
View Article
Words by: Alan Tulla
This Design Clinic is different from previous ones in that it deals almost exclusively with the appearance of the bridge rather than its use. It also happens to be the largest structure we have ever illuminated!
A major consideration in most Design Clinics concerns the functionality of the lighting. We deal with questions like: is there sufficient illumination for the task, will people feel secure, can trip hazards be seen, is there sufficient uniformity to avoid dark shadows, will people with poor vision be able to use the space etc.
But when you are lighting the outside of a bridge, apart from making it visible to navigation, the appearance is almost the only justification for the lighting. If it won’t look good, why bother to light it?
Before you start on your design, speak to other experts such as architects, historians and heritage specialists. They will be able to tell you what are the important features of the bridge. Town planners can put the bridge in context.
You can also save yourself a lot of time by speaking to engineers about where you can actually position the luminaires. A beautiful design is useless if it can’t be installed and maintained!
A small point related to this is that the low mounted floodlights might be more easily accessible from the river although, obviously, you do need to ensure they are above the high water level.
Bridges are often seen against a dark night sky. An early consideration in your design should be to minimise/exclude light spill. Mist over rivers can make this light very visible. A good solution is to use luminaires which tightly control the light. Wherever possible, make sure that all the light only illuminates the façade and does not spill beyond the structure. Visors, baffles and honeycomb louvres are all useful accessories. WE-EF are very good in this respect.
Related to this is the illumination level on the facade. Generally, bridges are seen against a dark background such as a river and so you do not need as much illumination as you would for a building in a city centre. National or local guidance may well have upper limits for the luminance (its brightness in cd/m2) of the bridge façade.
Be careful of using coloured light if your bridge passes over a railway or navigable river. You do not want to risk it being confused with any signalling. There will almost certainly be regulations on this topic.
Lastly, if you are unsure about what the bridge should look like, don’t be afraid to give the aesthetic design to a professional. The lighting design profession is over 50 years old and its practitioners know how to make buildings and spaces look good.
Our bridge is approximately 18m (60 ft) high and 180m (200 yards) long.

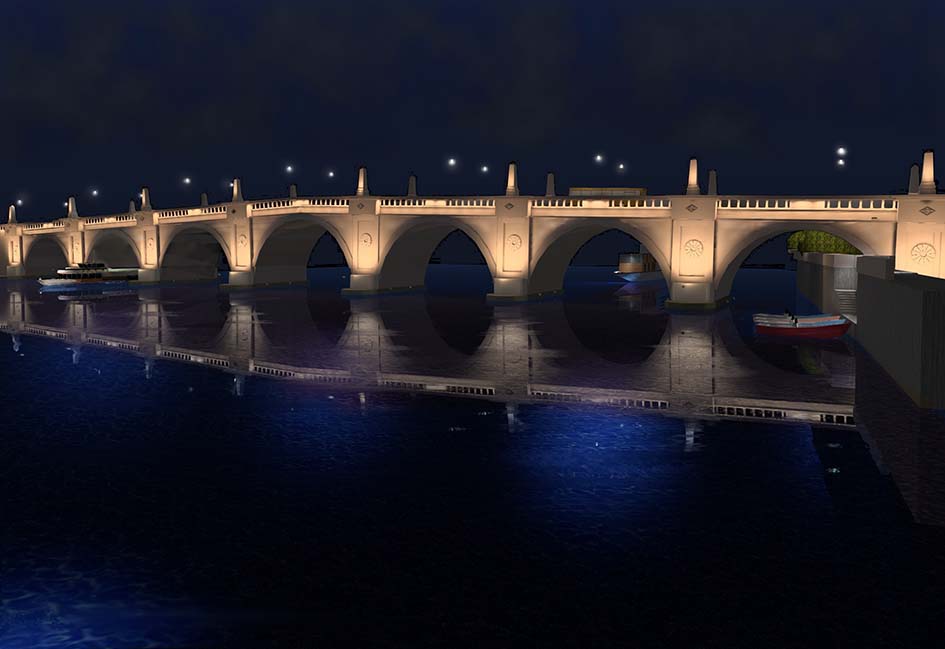
1. All White
Bridges link places together and a good way to show this is by illuminating a parapet, ledge or handrail so that there is a continuous line of light from one side to the other. It is better to have the light shining downwards, to avoid upward spill light, but this may not always be possible.
Here, we have used the VLR surface mounted luminaire mounted under the parapet and shining downwards. It is available with a symmetric beam or a wall-wash optic. The built-in drivers with DALI control mean that you can dim the luminaire to exactly the illumination level you want.
A particular feature of this linear luminaire is that it is IP67 and factory sealed and so there is no chance of moisture entering the system during installation or maintenance.
Where the structure of the bridge does not allow a continuous line of light, you will need to illuminate the unlit areas so that the bridge appears to be one single body. In this case, we have used the powerful FLC240 floodlight with a symmetrical wide angle beam on the piers.
The underside of the arches are unlit. An equally attractive alternative solution would be to illuminate the arch with white of a Cooler colour temperature, CCT.
One final point to note is that we have used 3,000K LEDs to give a warm appearance to the stone.
Tech Spec A
Luminaires: Linear VLR and wide angle FLC
Optical control: Either symmetric or asymmetric with pmma lens
Quantity: Continuous line
Arrangement: Continuous line plus one FLC on each pier
Wattage per luminaire: VLR 22.5W and FLC240 104W
Pros: Reveals the whole facade

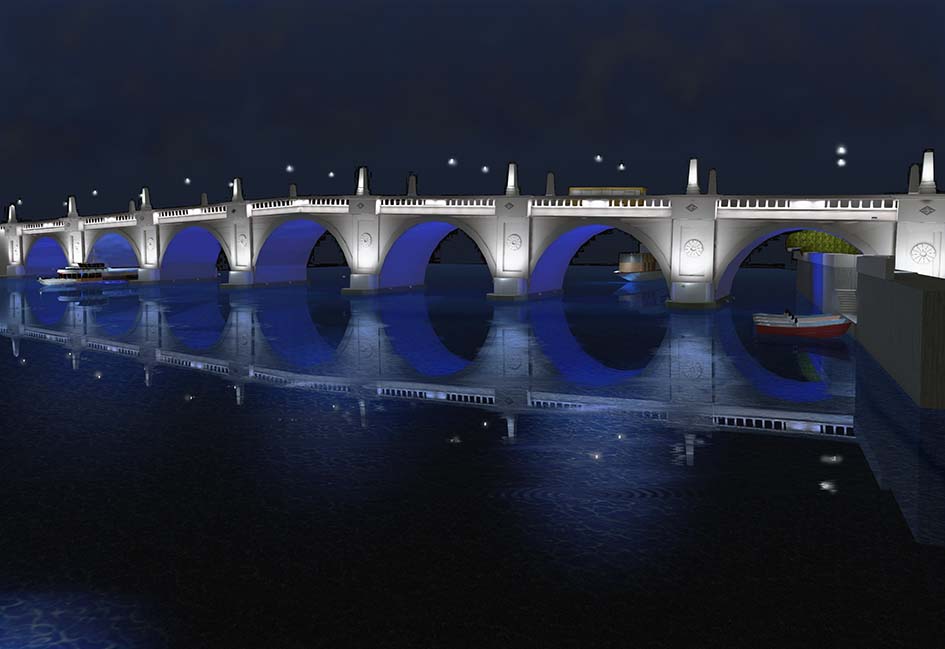
2. A Touch of Color
The introduction of LEDs to exterior lighting meant that it was very easy to use saturated colours in a night scene. Previously, light sources were “white” and you had to use filters to produce colour. In terms of energy use, this was extremely inefficient. If you wanted a strong single colour, 90 per cent of your input power might have been “filtered away”. LEDs are much more efficient in this respect.
Both the linear VLR and symmetrical FLC are available in colour change options.
The technique used here is to use just one colour (blue) in combination with white. Too many different colours can distract from the shape and architecture of the bridge. When thinking about using colour, always consider why it is being used. The colours of the national flag and country holidays are easily recognisable. So, too, are football teams and other sporting colours.
Facades that change colour with wind direction or temperature may not be so easily understood by the people who see it.
The contrasting colours also highlight the strong three-dimensional character of the bridge.
The FLC240 with wide angle beam is used to light the piers. Under the arches, we have used the FLC240CC colour change version. The DMX controlled driver and interface is integral with the luminaire but held in a thermally separate compartment.
Tech Spec B
Luminaires: FLC240 and FLC240CC
Arrangement: One on each pier plus four under each arch
Wattage per luminaire: 104W
Pros: Adds colour

3. Geometric
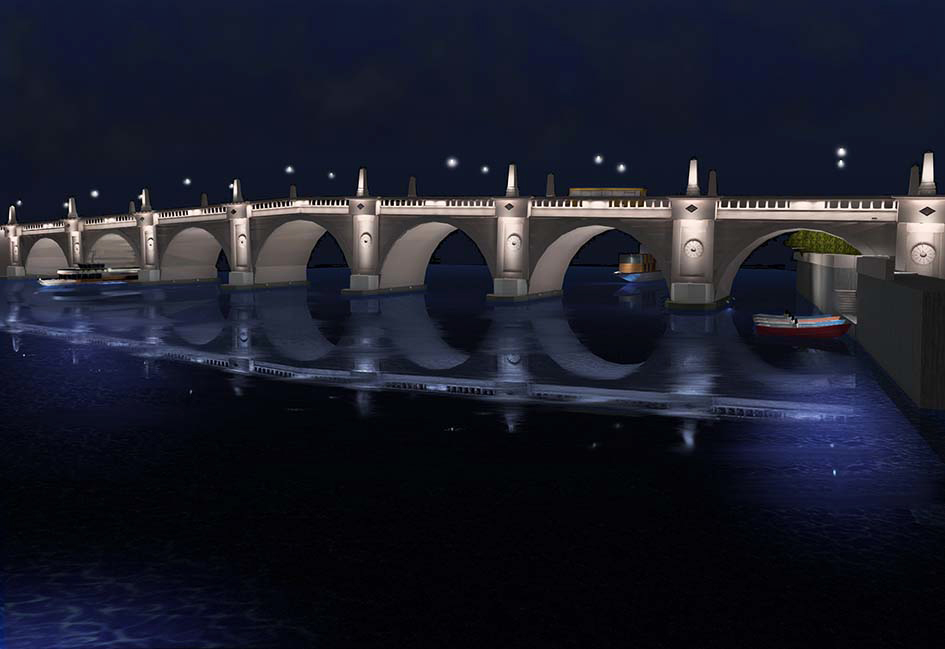
This design is different from the others in that it emphasises the horizontal and vertical elements of the bridge, producing a strong repeating pattern of light and shade. This technique works especially well with modern, unadorned types of bridge.
Bridge piers tend to be quite narrow so that the navigable width of the river can be maximised. The FLC220 symmetrical projector has four choices of suitable beam widths, from medium to very narrow, so it can suit almost any width of pier.
The narrow angle beam reveals the form of the piers and details such as the bas-relief roundels. For other features, a wall-wash beam option will give a grazing light and is useful where the architectural features cover a wide area.
The height of the piers is further emphasised by the use of the small FLC121 symmetrical spotlights at the base of the plinths. This 12W spotlight has a choice of six different beam widths plus a wallwash option.
As before, we have used the linear VLR to produce a strong horizontal line of light.
We have also added a small amount of illumination under the arches in order to reveal the form of the bridge. These are dimmed to quite a low level.
Tech Spec C
Luminaires: FLC220 narrow and wide plus FLC121
Arrangement: One on each pier plus four, dimmed, under each arch
Wattage per luminaire: 26W, 12W
Pros: Simple and low energy

